Monday, September 30, 2013

Hickory Smoked Wings (like Slick Pig's)

 
Oh.My.Word.  Hickory smoked wings.  There is this wing joint in Murfreesboro, TN called Slick Pig.  They are famous for their hickory smoked wings.  But of course their recipe is top secret.   Welp.. I just had to figure out how to make wings like these.  One little problem.. I know NOTHING about smoking.  First I searched for a smoker on Amazon and found this easy enough for a beginner smoker (Stovetop Smoker ) for $43.95 - so it didnt break my account.  This came with Hickory Wood Chips and Alder Wood Chips.. that was great because I would be needing the Hickory for this recipe.  I then set out to re-create that slick pig taste.  I did two test runs.  Both were good.  The second batch however, seemed closest.  The group of people who I tested them on (who have all had slick pig's) said the flavor was very close...but maybe better.  I'll bet Slick Pig doesn't use these ingredients (so I'm not claiming they do) ..maybe some of them.. but this is what I used to create the oh so popular flavor.  


To get your wings the shape you get them at a restaurant cut them in these spots.  Discarding the pointy end - forgive my lack of knowledge of the correct terms for chicken anatomy...  *Note: unless you have a meat cleaver or a very sharp knife, its easier to do this after they are cooked. *orrr you can just go the easier route and buy a bag of precut "chicken wing sections" :)


Marinate your wings in the fridge for 24 hours.


Get your smoker ready by adding Hickory wood chips to the bottom of your Stovetop Smoker .  Put your drip pan over that and your wire rack over that.  *Note - If you're using a different smoker.. do your wood chips according to instruction for your smoker.

 
Load up your smoker.


Place smoker on the grill or on your stove top at medium heat. Smoke for about an hour or your desired color of wing.. as long as they are done :)


Ingredients

Chicken Wings
1/2 cup Soy Sauce
3/4 cup Teriyaki Marinade
1/4 cup Worcestershire Sauce
3 heaping tblspoons of Hoisin Sauce

Helpful items:
Smoker
Hickory wood chips
  
 
Directions

Combine the last four ingredients in a Gallon size freezer bag; Stir so Hoisin sauce is blended in.  Add the wings to the bag making sure they are coated well.  Put in the fridge to marinate for 24 hours.

Get your smoker* ready by putting about 2 1/2 tablespoons of Hickory woodchips in the bottom layer of the smoker.  Put the drip pan over those woodchips. Put the wire rack in the drip pan... I wrap the wire rack in aluminum foil for easier clean up. 

Load your wings onto the wire rack.  Put the lid on.  Place your smoker on your stove top or your BBQ grill at medium heat.  Smoke for 45 min to 1 hour.  This gives them a YUMMY smoke flavor.

To get a little crispyness I throw them directly on the grill for 1-2 minutes**.  Scrum-didly-umptios.

*Alternatively: if you dont want to use a smoker you may be able to cook these in the oven for 45 min to an hour putting it on broil for the last 10 min.  If you do it this way I would add liquid smoke flavor to the marinade because you will be missing the delicious smoke flavor from the smoker.. I have not tried an oven version yet.  But when I do I will update this recipe.

**If you don't have a grill.. you can toss the smoked wings into a frying pan with just a tad bit of oil for a couple minutes to get that bit of crispyness.


I found this book on amazon - its a smoking book for this particular smoker!  I havent ordered it .. but I just might.


Rate this posting:
{[['']]}

Thursday, September 19, 2013

Southwest Beef Chimichangas w/ Spicy Jalapeno Ranch Sauce


The boys raved about these chimichangas.  Try them.. let me know if you enjoyed them as much as we did.

*These chimichangas and the sauce are my own recipe. If you re-post it somewhere or blog it please give me credit and link back to my blog. I would appreciate it.


  • 1 pound ground beef
  • 1/2 cup chopped onion
  • 1 packet taco seasoning
  • 1/2 can whole kernle corn
  • 1/2 can black beans
  • 1 teaspoon minced garlic
  • garlic powder, to taste
  • onion power, to taste
  • seasoning salt, to taste (I use Johnny's Fine Foods Seasoning Salt )
  • flour tortillas (10 inches), warmed
  • Oil for deep-fat frying
  • 1-1/2 cups (6 ounces) shredded cheddar cheese

  • For the sauce:

    Make Hidden Valley Ranch per the instructions
    In a food processor or blendor puree 1 jalapeno (no seeds.. 1/2 the seeds if you like spicier), add to the ranch
    Add Siracha, to taste.
    Add Louisiana Hot Sauce, to taste. 

    Alternatively you can use Creamy Jalapeno Ranch (Chuy's Copycat) as the sauce for this dish. 
    Either way is great.
    1. In a large skillet, cook beef and onions & taco seasoning over medium heat until pink is nearly gone. Stir in the black beans and corn, garlic powder to taste and onion powder to taste- cook another minute. 
    2. Spoon desired amount of beef mixture off-center on each tortilla - its best to use a spoon with holes. Fold edge nearest filling up and over to cover. Fold in both sides and roll up. Fasten with toothpicks.
    3. In an electric skillet or deep fryer, heat 1 oil to 375°. Fry the chimichangas for 1-1/2 to 2 minutes on each side or until lightly browned. Drain on paper towels. Sprinkle with cheese. Serve with sauce.  You can also top with Pico De Gallo (optional).
    Serve with my Mexican Rice


    Rate this posting:
    {[['']]}

    Mexican Rice


     In my search for perfect mexican rice, of course grabbing the Rice-a-Roni version was an option - but no, I found a home made mexican rice recipe... which I changed up.. as I usually do..  I like to give things my own Mrs. Scales flavor.. and usually it turns our flavorful and yummy.    Here goes.. the recipe originally from www.foodnetwork.com but changed and modified by moi..

    Ingredients:
  • 2 tablespoons butter
  • 1 1/2 cups long-grain rice
  • 1 tsp onion powder
  • 1/2 tsp garlic powder
  • 1 clove garlic, minced
  • 2 cups water
  • 1 can Rotel (original or spicy)
  • 1 teaspoons chili powder
  • 1 teaspoon salt
  • 1 cup shredded Cheddar
  • 1 tsp olive oil

  • Directions

    In a large saucepan, melt the butter over medium heat. Add the rice, onion powder, garlic powder, and minced garlic. Cook until the rice is browned. Stir in the water, tomatoes, chili powder, and salt and bring to a boil. Reduce the heat and simmer, covered, until the rice is tender, about 15 to 17 minutes. Stir in the cheese and olive oil and transfer to a serving bowl.

    Serve with Chimichangas (pictured below) or Enchiladas... or pretty much any mexican dish.  :)


    Rate this posting:
    {[['']]}

    Friday, September 13, 2013

    Shrimp Scampi Linguini

     
    Finally..the end of the work week ..I was ready for some comfort food!  I was also ready for seafood.  Seafood could easily be one of my favorite foods. love love love.  Being from Seattle fresh seafood was a constant.  Easliy attainable at any moment.  Oh I do so miss Pike Place Market.  Working downtown made it easy for me to pop over on my lunch, grab all the fresh seafood (seriously fresh.. like right out of the water .. Pike Place is right near the pier) that I could put in my work fridge and take home at the end of the day. 


    I now live in Tennessee ... as you can imagine, this is nowhere near the ocean.  So Kroger seafood department it is.  It works.   I had some frozen shrimp on hand so I decided to cook up a Shrimp Scampi Linguini Pasta.  Glad I did.  It was flavorful and nice to curl up on the couch with while watching the newest Breaking Bad.  The boys loved it.  There were no leftovers. lol.  On to the recipe...
     
    Shrimp Scampi Linguini
    
    • 10 oz linguini pasta
    • 4 tablespoons butter
    • 4 tablespoons extra-virgin olive oil, plus more for drizzling
    • 2 shallots (or half an onion), finely diced
    • 2 cloves garlic, minced
    • Pinch red pepper flakes, optional
    • 1 pound shrimp, peeled and deveined
    • Kosher salt and freshly ground black pepper
    • 1/2 cup dry white wine
    • Juice of 1/2 lemon
    • 1/4 cup finely chopped parsley leaves
    • 1/2 cup shredded parmesan cheese
    • Seasoning salt (I use Johnny's)
    • Sprinkling of blackened Cajun seasoning (optional but yummy)
    • Sprinkling of Garlic powder

    Directions

    For the pasta, put a large pot of water on the stove to boil. When it has come to the boil, add a couple of tablespoons of salt and the linguini. Stir to make sure the pasta separates; cover. When the water returns to a boil, cook for about 6 to 8 minutes or until the pasta is not quite done. Drain the pasta.

    Meanwhile, in a large skillet or WOK , melt 2 tablespoons butter in 2 tablespoons olive oil over medium-high heat. Saute the shallots, garlic, and red pepper flakes (if using) until the shallots are translucent, about 3 to 4 minutes.

    Season the shrimp with, pepper, seasoning salt, garlic powder, blackened seasoning; add them to the pan and cook until they have turned pink, about 2 to 3 minutes. Remove the shrimp from the pan; set aside. 

    Add wine and lemon juice and bring to a boil. Add 2 tablespoons butter and 2 tablespoons oil. When the butter has melted, taste sauce, drain more of needed, return the shrimp to the pan along with the parsley and cooked pasta. Stir well and season with salt and pepper, mix in a 1/4 cup shredded parmesan. Drizzle over a bit more olive oil and serve immediately. Garnish with more shredded parmesan and another sprinkling of seasoning salt.
     
     
    Also try these great pasta dishes:


    Rate this posting:
    {[['']]}

    Wednesday, September 4, 2013

    Sausage Cheese Balls


    1 c Bisquik
    2 c Cheddar Cheese, shredded
    1 lb sausage (jimmy dean or other;  spicy, breakfast, or regular)
    1/8 tsp salt
    1/2 tsp garlic powder
    1/2 tsp cayenne pepper (unless you're using spicy sausage)
    1/2 tsp seasoning salt

    Preheat oven to 375.  Mix all together in bowl with your hands.  Form into 1 inch balls by rolling in your hands, you know, like you used to do with play-dough.  Assemble on a greased cookie sheet, lined with foil if you dont want extra mess.  Cook at 375 for 20 min or until golden brown.

    Sauce:

    Mix together
    1 tbsp mustard
    1/2 cup mayo


    Other great appetizers to try:
    Blue Cheese Bacon & Chive Kettle Chips
    Grilled Veggies
    Creamy Jalapeno Ranch Dip (Chuy's Copycat)
    Pico De Gallo
    Cream Cheese Stuffed, Bacon Wrapped Jalapenos (Low Carb)
    Jalapeno Fudge (Low Carb)
    Jalapeno Bacon Wrapped Shrimp (Low Carb)
    Scotch Eggs (Low Carb, Gluten Free)


    Rate this posting:
    {[['']]}

    Monday, September 2, 2013

    Apple Crumble Pie


    Filling
    -3 whole Large (4 Or 5 Small) Granny Smith Apples, Peeled, Cored, And Sliced Thin
    -1/2 cup Brown Sugar
    -1/2 cup Sugar
    -1 Tablespoon All-purpose Flour
    -1/2 cup milk or 1 c heavy cream
    -2 teaspoons Vanilla Extract
    -1/8 teaspoon Cinnamon


    Topping
    -1 stick softened butter
    -3/4 cups All-purpose Flour
    -1/2 cup Brown Sugar
    -1/4 cup Pecans (optional) (i didn't use pecans because hubs doesn't like nuts)
    -Dash of Salt

    Preparation Instructions
    Preheat oven to 375 degrees.
    Roll out pie dough and place it in a pie pan. Decorate the edges as desired.  Or used a store bought deep dish pie crust.
    Mix together cream, 1/2 cup brown sugar, 1/2 cup sugar, 1 tablespoon flour, vanilla, and cinnamon. Mix in apples stirring and coating well. Pour apples into pie shell.
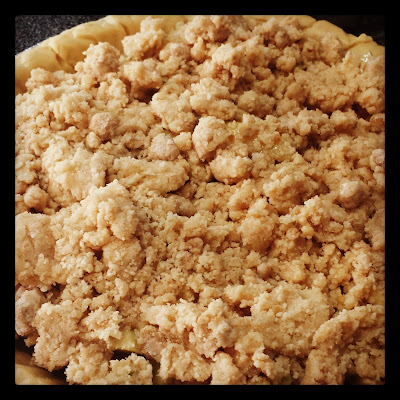
    Combine butter, flour, sugar, pecans (chop if you're not using a food processor), and salt. Mix until everything comes together in clumps. Pour topping over apples.
    Lay a piece of flat foil loosely over the top of the pie. Place pie pan on top of a rimmed cookie sheet and bake for one hour. At the end, remove foil and allow to finish baking and browning. Can bake for up to 15 or 20 minutes more if necessary.
    Remove from oven when pie is bubbly and golden brown.

    My family loves this pie warm.  Can be served chilled.

    Before the oven


    Recipe adapted/modified from the poor sophisticate


    Rate this posting:
    {[['']]}